Jcprasad's Blog

November 20, 2009

Apps DBA Interview Questions – Part – I

Filed under: FAQ's — jcprasadinfo81 @ 1:15 am

Oracle Apps DBA – Interview Questions

1. what is the utility to change the password of a dba schema in oracle apps? Ans: FNDCPASS
2. what are mandatory users in oracle apps?
Ans: applsys,applsyspub,apps
3. What simplay a oracle Architechture?
Ans: Desktop Tier, Application Tier, Database Tier

5. What are the components in the Application Tier?
Ans: Apache(http)
Jserver(jre)
Forms Server(f60srv)
Metric Server(d2ls)
Metric Client(d2lc)
Report Server(rwm60)
Concurrent Server(FNDLIBR)
Discoverer

6.What are main file systems in Oracle Apps?
Ans: APPL_TOP, COMMON_TOP,
DB_TOP,ORA_TOP

7. What are there in Desktop Tier?
Ans: Internet Browser, JInitiator

8. What is the location of JInitiator in the Desktop Tier?
Ans: c:\program files\oracle\Jinitiator

9. What is the location of client cache?
Ans: c:\documents and settngs\user\oracle jar Cache

10. What is the location of Server cache?
Ans: $COMMON_TOP/_pages
11. Which package will be used for the user validation by plsql agent?
Ans: oraclemypage
12. What are adadmin utilities? and Its location?
$AD_TOP/bin
Ans: 1.adadmin
2.adpatch
3.adsplice
4.adident
5.adrelink
6.adlicmgr
13.What are the location of JaVA Files?
Ans: JAVA_TOP and all PRODUCT_TOP/Java/Jar
14. What is the name of the xml file of Apps and its location?
Ans: Context Name.xml and $APPL_TOP/admin
15. what is the location of Apps environment file? and its name?
Ans: contextname.env and $APPL_TOP
16. In how many way Jar files are generated?
Ans: Normal and Force
17. Once Jar files are generated what files get effected?
Ans: All Product_top/java/jar files and Two files in JAVA_TOP they are appsborg.zip
appsborg2.zip
18. How do you see the files in zip file?
Ans: unzip -v
19.How do you generate jar files?
Ans: Using adadmin and option 5
20. How do you start the apps services?
Ans: $COMMON_TOP\admin\scripts\Contextname\adstrtal.sh apps/appspwd
21. What is the executable to generate jar files?
Ans: adjava
22. How do you relink a executable of a product
Ans: by relinking option in adadmin or adrelink
23. How do you relink AD product executable? and usage?
Ans: adrelink.sh and adrelink.sh force=y “ad adsplice”
24.When do you relinking?
Ans: 1. when you miss a executable file
2. When there is a problem with any executable file
3. When any product executable get currupted
25. What is DAD?
Ans: It is a file which stores apps passwords in hard coded format. i.e wdbsvr
26.How do you relink OS files and libraries?
Ans: using make command
27.What is compile scheman option in adadmin?
Ans: This option is used to compile/resolve the invalid objects
28. Where do you get the info about invalid objects?
Ans: from dba_objects where status=invalid

29.How do you compile an obect ?
Ans: alter object_ type objet _name compile. Eg: alter table fnd_nodes compile
30.How do you see the errors of a table or view?
Ans: select text from dba_errors where name=’emp_view’
31. How do you see the errors in the db?
Ans: show error
32. How do you compile a schema?
Ans: using utlrp.sql (location is ?/rdbms/admin/) or
going adadmin, compile schema option
33. How do you know how many invalid objects are in specific schema?
Ans: select count(*) from dba_objects where status=’INVALID’ group by owner;
34. How do you know the package version?
Ans: select text from dba_source where name=’package name’ and type=’PACKAGE BODY’ and rownum<10>/rdbms/admin)
41. How do you load java class to databae?
Ans: loadjava
42. What are restart files? and its location?
Ans: These files contains the previouse session info about adadmin.. location is $APPL_TOP\admin\sid\restart\*.rf9
43.How do you validate apps schema?
Ans: To validate synonyms, missing sysnonyms and all grant. You can do it in adadmin. after validating it iwll produce
a report in the location $APPL_TOP\admin\sid\out\*.out
44. How do you enable maintainance mode?
Ans: using adadmin or running a script called “adsetmmd.sql ENABLE/DISABLE” (AD_TOP/patch/115/sql)
45.What is APPS_MRC Schema?
Ans: It is used for multi language support. To synchronize APPs schema and APPS_MRC
46. How to see the version of a script or form or report or etc?
Ans: grep Header adsetmmd.sql or adident Header adsetmmd.sql
strings -a GLXSTEA.fmx grep Header or adident Header GLXSTEA.fmx
47.What is the location of adadmin log?
Ans: $APPL_TOP\admin\sid\log
48. What are the oracle homes in Apps?
Ans: 8.0.6ORACLE_HOME(Dev 6i products) and IAS_ORACLE_HOME (Apache)
49. How do you configure you ipaddress at client side? and server side?
Ans: c:\windows\system32\drivers\etc\hosts and \etc\host
50. What is the location of Datbase server related scripts?
Ans: $ORACLE_HOME\appsutil\scripts\contextname
51. what is the utility to clean the concurrent manager?
Ans: @cmclean.sql ( You have download from metalink)
52. How do you stage the 11.5.10 Apps software?
Ans: using adautostg.pl
53. What is the location of the source files of forms?
Ans: AU_TOP/forms/US/
54. What is the executable to generate forms?
Ans: f60gen

November 16, 2009

NFS Mounting

Filed under: Apps11i — jcprasadinfo81 @ 9:17 am

NFS MOUNTING

Source (Dump Location)

Login as root

Vi  /etc/exports

/stage * (rw,sync)

:wq!

Service nfs restart

Target System

Login as root

Cd /

Mkdir –p /stg

Cd

Mount –t nfs 192.168.215.25:/stage /stg

untitled

November 13, 2009

Tracing Concurrent Request

Filed under: Apps11i — jcprasadinfo81 @ 8:06 am

PURPOSE

——-

The purpose of this document is to provide instructions for tracing concurrent programs, especially those that process for a long time.  Programs completing in short periods of time may not be traceable.

SCOPE AND APPLICATION

———————

These instructions pertain to tracing the Inventory or Planning Manager.

TRACING CONCURRENT PROGRAMS

—————————

Specific examples are Tracing Inventory Manager – INVLIBR or

Planning Manager – MRCLIB (MRP Manager)

In the following replace ‘%INVMGR%’ with ‘%MRPMGR%’ for tracing MRP manager.

1)  SELECT s.sid     SID,

s.serial# SERIAL#,

s.program PROGRAM,

p.spid    PID,

s.process PPID

FROM   v$process p,

v$session s

WHERE  p.addr = s.paddr

AND    s.username like ‘%APPS%’

AND    s.program  like ‘%INVMGR%’;

SID    SERIAL# PROGRAM                           PID       PPID

—– ———- ——————————— ——— ———

57        222 INVMGR@naops06 (TNS V1-V3)        10149     10143

NOTE : SID and SERIAL# ( You will need this in Step number 2)

Where username is apps schema / user name

Ensure the correct program is traced by doing the following validations.

a) Using the PPID from the above SQL script on the unix prompt

execute the following command

$ ps -ef | grep 10143

UID   PID  PPID  C    STIME TTY      TIME CMD

—— —– —–  – ——– —      —- —

v1102000 10143 10041  1   Mar 28 ?       10:42 INVLIBR FND Concurrent_Processor   MANAGE OLOGIN=  “APPS/8A9EA6A0000000000000000000

oracle 10149 10143  5   Mar 28 ?       139:37 oraclev1102000 (DESCRIPTION=(LOCAL=YES)(ADDRESS=(PROTOCOL=beq)))

b) OR

Run the following SQL Script

SELECT CONCURRENT_PROCESS_ID FROM fnd_concurrent_processes

WHERE  OS_PROCESS_ID = 10143;

CONCURRENT_PROCESS_ID

———————

251012

Login  as  SysAdmin and go to Concurrent–>Manager–>Administer

Find the Inventory Manager and click on processes button. Check

the Concurrent column with Active Status that should be same as

the one from the above SQl statement.

2) Enable tracing:

sqlplus sys/password

execute dbms_system.set_sql_trace_in_session(SID,SERIAL#,true);

3) Disable tracing:

sqlplus sys/password

execute dbms_system.set_sql_trace_in_session(SID,SERIAL#,false);

November 12, 2009

Oracle Database Upgradation 9.2.0.6 to 10gR2 on SUNOS & Oracle E-Business Suit 11.5.10.2

Filed under: Apps11i — jcprasadinfo81 @ 2:47 am

Oracle E –Business suit 11.5.10.2 does not work with the database 10.2.0.1 so we need to upgrade the database to the next patch set level 10.2.0.2
Next post following this one is about upgradation from 10.2.01. to 10.2.0.2
.
Introduction
Upgradation of Oracle Database on Sun OS using DBUA is same as like other DBUA on other platforms. The only difference lies in setting operating system parameters like kernel configuration, checking memory, disks and other resources.
.

2. Objective
The objective of this document is to detail out the Upgradation steps of Oracle 9.2.0.6 to 10GR2 on Sun OS using DBUA .

.
3. Audience
This document is for Oracle Applications DBA. It is expected DBA performing the installation has fair knowledge of the Sun Solaris (UNIX) Operating System.

.
4. Assumption
• The Sun Solaris (UNIX) Operating System is installed on the Sun Solaris Hardware with all the required resources.
• All the required file systems are created with sufficient disk space as required for Oracle Applications Software and Database.
• The Staging area for Oracle Database is created
• Application DBA performing installation has a graphical interface with the Sun OS system. We are going to use xmanger 2.0 software for accessing the Sun OS from remote client.
• The openwin – xterm process is running on the server.

.

5. Pre – Requisite
Before Starting Upgrading process we have to apply two important patches in the Source
1. 10g Release 2 interoperability patch for 11.5.10 (4653225)
2. 5478710 (TXK (FND & ADX) AUTOCONFIG ROLLUP PATCH O
Refer Metalink Note 362203.1

6. Creating Staging Area on the Server
Staging Area is an area from where you will stage the Oracle 10GR2/Companion Software and run the installation programme. Staging area for Oracle 10GR2 requires around 3-4 GB of disk space.

Mount the DVD’s of Oracle 10GR2/Download from oracle websites otn.oracle.com on the server and copy the DVD’s in the staging location.

Create directories named as the stage (this you can get from the DVD’s component.label file).
Copy all the DVD’s of similar components in same stage area.

Stage No. of DVD’s DVD Contents
Oracle11 Software 1 Disk1 /d33/stage
Oracle Companion 1 Disk2 d33/stage /stage1

.
7. Checking the Sun Operating System
System and hardware Configuration:
Hardware Status: sun4 (UNIX command; ‘arch’)
Operating System: SunOS 5.11 Generic sun4u sparc SUNW, Sun-Fire-V240 (UNIX command; ‘uname –a’).
CPU: 2 CPU’s. Each having the sparcv9 processor operates at 1503 MHz and has a sparcv9 floating point processor (UNIX command; ‘psrinfo –v’).
Memory size: 5120 Megabytes (UNIX command; ‘prtconf |grep size’).
Swap Total: (45440k bytes allocated + 4032k reserved = 49472k used) 14468936k available, i.e., 14GB (UNIX command; ‘swap –s’).
Check file System mounted and its respective size (UNIX command; ‘df -h’).

8. Create base directories for Oracle 10GR2 installation
From the mounted file system decide which file system will hold the database tier
For Ex:
/d35 – 32 GB – Oracle 10G Database Software (ORACLE_10GHOME RDBMS,)Create directory “/d35/ora10G/10.2.0”

9. Create OS group and Users and granting required privileges and file permissions
Create operating system group “DBA” and OS users “ora10G” for database tier . Note that we are planning to upgrade database tier owned by “oracle” user but both on the same host / system. But new Oracle_10G Home owner and source Oracle_9i Home owner should fall under same group.

Check the group created in “/etc/group”
# cat /etc/group |grep dba
dba::110:

Create Unix Users “oracle ”
Add these lines in “/etc/passwd” file:
ora10G:x:113:110::/orahome/ora10g:/bin/sh

Add these lines in “/etc/shadow” file:
Ora10g:30oQlK30ch6xY:13187::::::
Note that the user id is always unique and also the home directory given is the base directory as created above.

Give ownership of “/d35/ora10G” to “ora10G” .
# chown -R ora10G:dba /d35/ora10G
# ls -lrt /d35
/u01:
total 18
drwx—— 2 root root 8192 Jan 13 13:16 lost+found
drwxr-xr-x 2 oracle dba 512 Jan 23 12:34 ora10G

Give full file permissions on the staging area of Oracle Applications. Give “777” privileges on the staging area. Some unzip files are not able to get unzipped and then the installation gives error.

# pwd
/u06/stage
# ls
install runInstaller stage1
doc response stage welcome.html
#
# chmod -R 777 *
# pwd
/u06/stage
#

.
10. Universal Installer


11 Starting the X Windows session
Login to Server from a graphical interface console.

We are using Xmanager2.0 software for Oracle Universal Install and DBUA.

a href=”http://onlineappsdba.com/wp-content/uploads/2008/07/c1.JPG” mce_href=”http://onlineappsdba.com/wp-content/uploads/2008/07/c1.JPG”></a

Go to option and select ->Session->Java Desktop System 3

Environment settings

Logged in as “ora10G”  and set the profile Example ORACLE_BASE=/d35/test/v10G;export ORACLE_BASEORACLE_HOME=$ORACLE_BASE/10.2.0; export ORACLE_HOMEORACLE_SID=PATCH ; export ORACLE_SIDLD_LIBRARY_PATH=$ORACLE_HOME/lib ; export LD_LIBRARY_PATHPATH=$PATH:/usr/local/bin:/usr/ccs/bin:/usr/sfw/bin:$ORACLE_HOME/bin ; export PATHVerify the profile using $ env|more Check the inventory_loc in Sun Solaris it is located in /var/opt/oracle/oraInst.loc  change the inventory location Check the oratab file in Sun Solaris it is located in /var/opt/oracle/oratab and comment the source instance because we are following the same ORACLE_SID for new ORACLE_10G .Example is below :- #v1:/d35/oracle/v1db/9.2.0:N

.

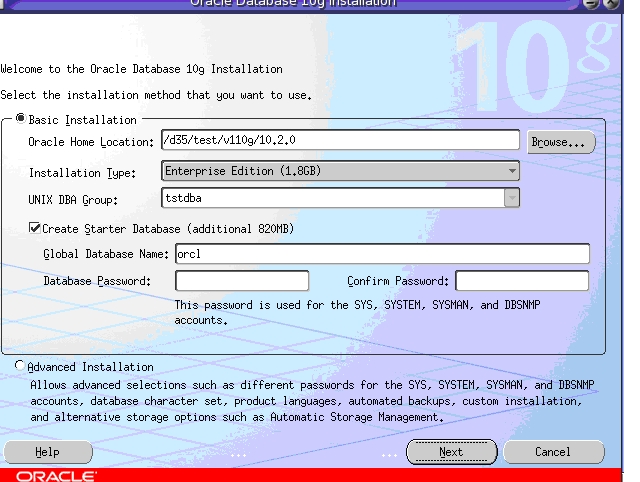
11.2 Starting Oracle 10G Software Installation.

Go to”/d33/stage” and execute “./runInstaller” command. The “Oracle 10g Database Installation Screen will Appear”.
In this screen change Global Database Name and enter password click Next.

.

11.3 Product Specific Prerequisite Checks

In “Product Specific Prerequisite Checks” Click Next . If any errors or warning appears rectify an proceed

.

11.4 Configuration Options

Select “Install Database Software Only ” and click “Next”.

.

11.5 Oracle Universal Installer Summary

In the “Oracle Universal Installer Summary” screen accept the default and click “Install ”.
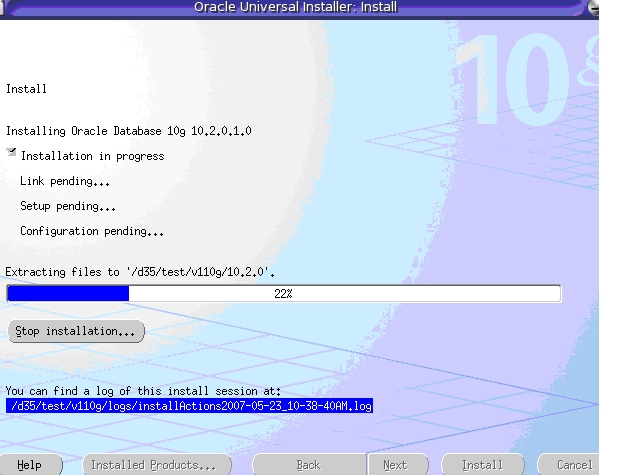
11.6 Install

In “Install” You have to monitor the log file. The log file location has been highlighted in the screen.

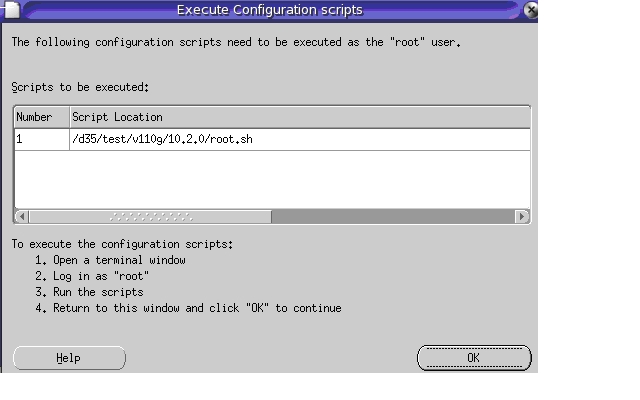
11.7 Execute Configuration Scripts

In “Configuration Scripts” screen select “ok” and follow the instruction the screen.

11.8 End of Installation

In the “End of Installation” Screen click Exit

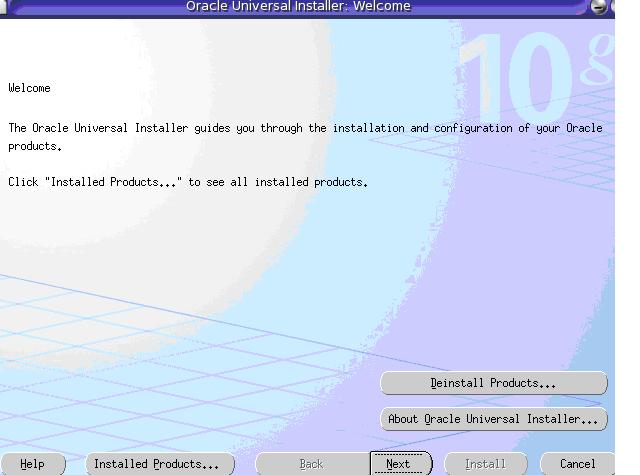
11.9 Oracle 10G Companion Software Installation

Go to”/d33/stage/stage1” and execute “./runInstaller” command. In the welcome screen click next

11.10 Select Product to Install

11.11 Specify Home Details

In the “Specify home Details” screen update the details as required and click “Next”.

11.12 Product Specific Prerequisite Checks

In “Product Specific Prerequisite Checks” Click Next. If any errors or warning appears rectify and proceed.

11.13 Oracle Universal Installer Summary

In the “Oracle Universal Installer Summary” screen accept the default and click “Install”.

11.14 End of Installation

In the “End of Installation” Screen click Exit.

11.15 Post Install Checks Check the log file for any errors .Login as Oracle 10G_home owner and check whether you are able to connect as sys $ sqlplus “/as sysdba”

you will get the follwing output $ sqlplus “/as sysdba” SQL*Plus: Release 10.2.0.1.0 – Production on Wed May 23 13:19:31 2007 Copyright (c) 1982, 2005, Oracle.  All rights reserved.  Connected to an idle instance:Oracle Database 10g Enterprise Edition Release 10.2.0.1.0 – 64bit ProductionWith the Partitioning, OLAP and Data Mining options SQL> 

11.16 Before you Begin Up gradation  in Source Database

a. Log in to the system as the owner of the new 10gR2 ORACLE_HOME and copy the following files from the 10gR2 ORACLE_HOME/rdbms/admin directory to a directory outside of the Oracle home, such as the /tmp directory on your system: ORACLE_HOME/rdbms/admin/utlu102i.sql ORACLE_HOME/rdbms/admin/utltzuv2.sql Make a note of the new location of these files.
.
b. Login as ORACLE_SOURCE  home owner. Go to /var/opt/oracle/oratab remove the comment and startup the database. Now you connect as sys owner from location where you have copied utlu102i.sql and utltzuv2.sql in sqlplus $ sqlplus “/as sysdba”  SQL>@ utlu102i.sqlSQL> spool off

c. The above sql generate output file called updatelog.lst review the output made the changes accordingly in target init.ora .SQL>@ utltzuv2.sqlSQL> spool off   The above sql generate output file called timezone.log review the output and change accordingly .

.
d. Check for the deprecated CONNECT Role After upgrading to 10gR2, the CONNECT role will only have the CREATE SESSIONprivilege; the other privileges granted to the CONNECT role in earlier releases will be revoked during the upgrade.

To identify which users and roles in your database are granted the CONNECT role, use the following query:

SELECT grantee FROM dba_role_privs
WHERE granted_role = ‘CONNECT’ and grantee NOT IN ( ‘SYS’, ‘OUTLN’, ‘SYSTEM’, ‘CTXSYS’, ‘DBSNMP’, ‘LOGSTDBY_ADMINISTRATOR’, ‘ORDSYS’, ‘ORDPLUGINS’,  ‘OEM_MONITOR’, ‘WKSYS’, ‘WKPROXY’, ‘WK_TEST’, ‘WKUSER’, ‘MDSYS’, ‘LBACSYS’, ‘DMSYS’, ‘WMSYS’,  ‘OLAPDBA’, ‘OLAPSVR’, ‘OLAP_USER’, ’OLAPSYS’, ‘EXFSYS’, ‘SYSMAN’, ‘MDDATA’, ’SI_INFORMTN_SCHEMA’, ‘XDB’, ‘ODM’);

If users or roles require privileges other than CREATE SESSION, then grant the specific required privileges prior to upgrading. The upgrade scripts adjust the privilegesfor the Oracle-supplied users.

.

e. In Oracle 9.2.x and 10.1.x CONNECT role includes the following privileges:

SELECT GRANTEE,PRIVILEGE FROM DBA_SYS_PRIVSWHERE GRANTEE=’CONNECT’ ;

GRANTEE PRIVILEGE—————————— —————————CONNECT                        CREATE VIEWCONNECT                        CREATE TABLECONNECT                        ALTER SESSIONCONNECT                        CREATE CLUSTERCONNECT                        CREATE SESSIONCONNECT                        CREATE SYNONYMCONNECT                        CREATE SEQUENCECONNECT

CREATE DATABASE LINK In Oracle 10.2 the CONNECT role only includes CREATE SESSION privilege.

.

f. Create the script for dblink incase of downgrade of the database. During the upgrade to 10gR2, any passwords in database links will be encrypted. To downgrade back to the original release, all of the database links with encrypted passwords must be dropped prior to the downgrade. Consequently, the database links will not exist in the downgraded database. If you anticipate a requirement to be able to downgrade back to your original release, then save the information about affected database links from the SYS.LINK$ table, so that you can recreate the database links after the downgrade.

.

g. Following script can be used to construct the dblink.

SELECT‘create ‘||DECODE(U.NAME,’PUBLIC’,’public ‘)||’database link ‘||CHR(10)||DECODE(U.NAME,’PUBLIC’,Null, U.NAME||’.’)|| L.NAME||chr(10) ||’connect to ‘ || L.USERID || ‘ identified by ”’||L.PASSWORD||”’ using ”’ || L.host || ”” ||chr(10)||’;’ TEXTFROM  sys.link$       L, sys.user$       UWHERE L.OWNER# = U.USER# ;

.
h. Check the invalid objects in source instance using the following qyery :-
spool invalid_pre.lstselect substr(owner,1,12) owner, substr(object_name,1,30) object, substr(object_type,1,30) type, status from dba_objects where status <>’VALID’;
spool off
Compile all the invalid objects using Run the following script and then requery invalid objects: This script must be run as a user with SYSDBA privs using SQL*Plus:
$ cd $ORACLE_HOME/rdbms/admin
$ sqlplus ‘/as sysdba’
SQL> @utlrp.sql
Even  compile all the objects using Adamin utility of Oracle E –Business Suit .

.

i. Take Complete Backup of source  Application and Database

11.17     Copy the Important Parameter files

a. Login to Source ORACLE_HOME $ cd $ORACLE_HOME/dbsCopy init<SID>.ora to target ORACLE_10G home $ORACLE_HOME/network

Copy tnsnames.ora and listener.ora to target TNS_ADMIN directory

b. Made changes in init<SID>.ora and the changes which was suggested by the utlu102i.sql output.c. Made changes in Tnsanames.ora and Listener.ora as per situation.

.

12. Database Upgrade Assistant
Login to Xsession  again as target Oracle_10g home owner

$cd $ORACLE_HOME/bin
$./dbua

12.1 Database Upgrade Assistant Welcome Screen

In the “Database Upgrade Assistant Welcome Screen” Click Next

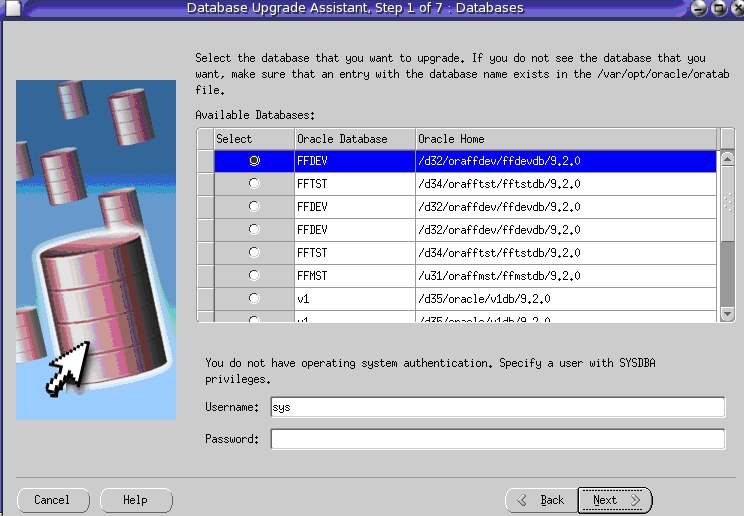
12.2 Database Upgrade Assistant Steps 1
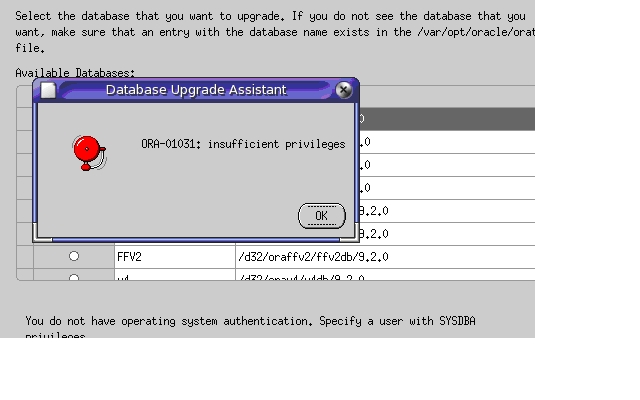
In “Database Upgrade Assistant” choose the proper source database click Next

12.3 Database Upgrade Assistant Steps 2
In “Database Upgrade Assistant Steps 2 “ It will take 20 to 30 minutes to get the database information and then click Next.

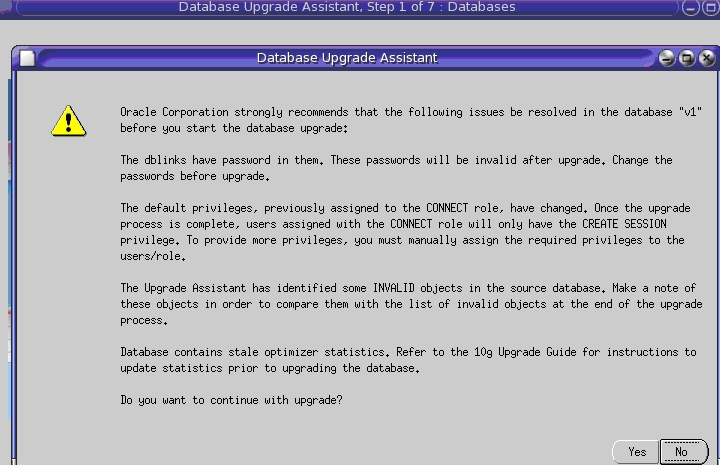
12.4 Database Upgrade Assistant Steps 3

In the “Database Upgrade Assistant Steps 3” Click Yes

12.5 Database Upgrade Assistant Steps 4
In the “Database Upgrade Assistant Steps 4”  Change the datafile location according to requirement Click Next

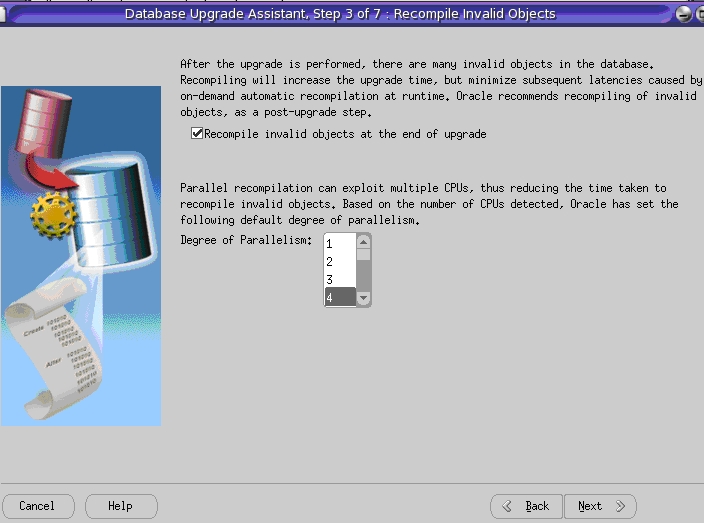
12.6   Database Upgrade Assistant Steps 5

Compile invalid Objects

In the “Database Upgrade Assistant Steps 5 Compile Invalid Objects” Select Degree of Parallelism. Degree of Parallelism depend on Number of CPU.

12.7  Database Upgrade Assistant Steps 6

In “Database Upgrade Assistant Steps 6” Select “I have already backed up my database”

And click Next

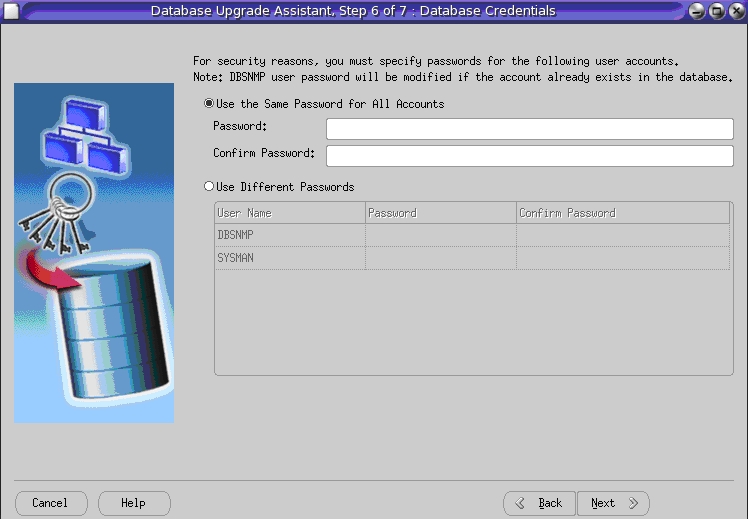
12.8   Database Upgrade Assistant Steps 7 Database Credentials

In “Database Upgrade Assistant Steps 7 Database Credentials”  Enter password and click Next

12.9  Database Upgrade Assistant Steps 7 of 7 Summary

In “Database Upgrade Assistant Steps 7 of 7 Summary” Click Finish

12.10  Database Upgrade Assistant Progress

Now its time to monitor log  file

End of Database Upgrade Assistant

.

13 Errors Encountered and the Solution

a. While running runInstaller Script encountered the following errors :- ./runInstaller: /backup/database/install/.oui: cannot execute This error was due to bad media, So I downloaded following files from otn.oracle.com

  1. 10Gr2_db_sol.cpio  (Oracle 10GR2 Software )
  2. 10Gr2_companion_sol.cpio (Oracle Companion Software)

Create Stage directory in any mount point give e.g.  /d33/stage  777 permission to that directory # cat 10Gr2_db_sol.cpio | cpio –icd   <Enter>
It will extract entire software under stage directory.
Create Stage1 directory under stage directory e.g. d33/stage /stage1 give 777 permission to that directory
#  cat 10Gr2_companion_sol.cpio | cpio –icd   <Enter>
It will extract entire software under stage directory.

b. While Running DBUA I have found the following errors :-

This is due to target and the source database owner is not in same group
Login as root;   Example source oracle database owner group is  dba , so change it accordingly .
# usermod -g dba ora10g
Login as ora10g owner and execute the following command
$cd $ORACLE_HOME
$ ls -l `find . ! -user ora10g`
In my system it gave the following output
-rwsr-x— 1 root dba 69028 2006-07-17 21:20 ./bin/extjob*
-rwsr-s— 1 root dba 18845 2006-06-21 09:13 ./bin/nmb*
-rwsr-s— 1 root dba 19999 2006-06-21 09:13 ./bin/nmo*
-r-sr-s— 1 root dba 14456 2006-02-04 21:57 ./bin/oradism*
-rw-r—– 1 root dba 1534 2005-12-22 13:39 ./rdbms/admin/externaljob.ora

Change ownership to the Oracle_10g Home using following command
#chown –R ora10g:dba /<Location> (Loging as Oracle_10g home owner) example ora10g

$ cd $ORACLE_HOME/rdbms/lib
$mv  config.o config.o.bkpEdit config.s file
and change the lines
/* 0×0008 15 */ .ascii “v2dba”/* 0×0014 20 */ .align 8.L13:/* 0×0014 22 */ .ascii “v2dba”to/* 0×0008 15 */ .ascii “dba”/* 0×0014 20 */ .align 8 .L13:/* 0×0014 22 */ .ascii “dba”$Edit  env_rdbms.mk From : KPIC_OPTION=-K PICTo : KPIC_OPTION=-xarch=v9 -K PIC$ make -f ins_rdbms.mk config.o ioracleIt has solved the problem

.

14. Summary

In this document we have covered:
1. Preparing the Sun Solaris system for Oracle 10GR2 Up gradation .
2. Creating Staging Area of Oracle 10GR2  Software.
3. Installing Oracle 10GR2 along with Companion Products  on Sun Solaris Server.
4. Upgrading Oracle Database from 9.2.0.6 to 10GR2

15. References

Oracle Metlink: https://metalink.oracle.com

Printer Basics in Apps 11i

Filed under: Apps11i — jcprasadinfo81 @ 2:41 am

Well lot of my readers were pushing me to write on printer configuration and I was dragging it since long but now as I have started getting lot of mails of printer step(either for certification or for interview) so finally I decided to start with Printers Basics & to understand printers in Apps Understanding these basics terminology is quite important.

Printer Drivers : As you see in last section under Install -> Printer Section, driver delivers command to printer about how to output a specific print style. You can understand them as series of instructions used by print style for a particular printer.
Example of Drivers is A4HPLJ4


Printer Style : Tells printer how printed output should look, for ex. Number of lines in page, width of line , whether header to print or not. A printer can have more than one style as long as printer supports it. If a print style is available & registers for a particular printer then only it will be visible to user (In some CM reports these styles are predefined and can’t be changed)
Example of Print Style is A4


Printer type : is to identify printer by manufacturer & model number for ex. HP laser Jet III

Printer Type form in Apps ( Install -> Printer -> Types) associate Style with Driver Name .
For Ex. with Printer Type HPLJ4 , you see style A4 & driver A4HPLJ4

SRW – Stands for SQL report writer driver file, Thing to Note w.r.t. SRW Driver file is that
If a report is for online viewing, report uses SRW named by print style in print style form.
If a report is for Printing , report uses SRW driver named by oracle Apps printer driver in Printer Drivers form.

Almost all standard Printer Types, Printer Driver & Printer Style are preconfigured in Apps. You just need to register your printer with Applications .

A lot more on how to register printers in Oracle Applications , Pasta Printing & using XML for printer in next Updates ..

For those whose mails I have not responded yet , thanks a lot for your patience I will try to respond you all ASAP .

http://teachMeOracle.com/forum

Next in series

Related Posts for Apps Printer

  1. Printer Basics in Oracle Apps 11i
  2. Pasta Printing with Oracle applications 11i

Generate Forms Trace in Apps

Filed under: Apps11i — jcprasadinfo81 @ 2:39 am

The steps I have followed :-

1. Login as oracle application user

2. Go to $FND_TOP/secure

3. java oracle.apps.fnd.security.AdminAppServer apps/ \AUTHENTICATION ON DBC=

Please check the below example :-

4. java oracle.apps.fnd.security.AdminAppServer apps/ffdev21 \AUTHENTICATION ON DBC=ffus.com_ffus.dbc
Output will be :-
AUTHENTICATION ON executed successfully – ffus.com_ffus.dbc

5. In the command prompt echo $FORMS60_TRACE_PATH
It will give you the trace path. Make sure the path is set.

6. Open internet explorer
Type the url below :-

http://:/dev60cgi/f60cgi/?&record=collect&log=$FORMS60_TRACE_PATH/

even you can change =$FORMS60_TRACE_PATH and can have your own path but make sure that path has got read and write permission .It is advisable to have default path.

Example is below :-

http://ffus.com:8000/dev60cgi/f60cgi/?&record=collect&log=$FORMS60_TRACE_PATH/faoracle.frd

Now you can generate FRD trace depend upon your situation

It will generate FRD trace file in your $FORMS60_TRACE_PATH directory with the name supplied by you in URL.

After finishing the the entire task make sure that you disable the trace :-
The steps are as follows:-

Note :- It has got security issues ,so make it disable.

1.Login as oracle application user

2.Go to $FND_TOP/secure

3. java oracle.apps.fnd.security.AdminAppServer apps/ \AUTHENTICATION OFF DBC=

4. java oracle.apps.fnd.security.AdminAppServer apps/ffdev21 \AUTHENTICATION OFF DBC=ffus.com_ffus.dbc
Output will be :-
AUTHENTICATION OFF executed successfully – ffus.com_ffus.dbc

Alternative Steps:

Backup and open $APPL_TOP/admin/_.xml context file

2. Update the context variable:
s_appserverid_authentication

By default in 11.5.10, this is set to SECURE.
In previous 11i versions, this was set to OFF.
For debug purposes, you can use ON or OFF

Make it ON

3. Run Autoconfig to instantiate the change.

You should now be able to access forms directly again using the f60cgi call.

4. After you have finished your Forms debugging, please reset
s_appserverid_authentication to SECURE and re-run Autoconfig

Oracle Applications 11i Hot Backup Cloning

Filed under: Apps11i — jcprasadinfo81 @ 2:09 am

We are getting lot of questions on Hot Backup Cloning of 11i in the forum. So we thought that, if we write one article regarding this, it will be more useful for the apps newbies. Here I am sharing the information that, what i follow during the hotbackup cloning. You all might have done this before.

Source System (PROD):

(a)   P4 3.0 GHz System with 2GB RAM and 200 GB HDD (Redhat Linux AS 4)

/d01 ——- 40 GB (Application Tier Files)

/d02 ——- 10 GB (10g Oracle Home)

/d03 ——- 80 GB (Data Files)

/backup —- 100 GB (NFS mount point Shared on TEST Server)

Hostname: prodserver

Application Version: 11.5.10.2

Database Version: 10.2.0.2 Target System (TEST):

(b)  P4 2.6 GHz system with 1.5 GB RAM with 300 GB HDD (Redhat Linux AS 4)

/d01 ——- 40 GB (Application Tier Files)

/d02 ——- 10 GB (10g Oracle Home)

/d03 ——- 80 GB (Data Files)

/backup —- 100GB (NFS Share Directory)

Hostname: testserver

Application Version: 11.5.10.2

Database Version: 10.2.0.2

Note: This target System was previously cloned with cold backup. This is second time cloning with Hot Backup from PRODSERVER.

Stage1: Prerequisites:

 ========> Apply OUI22 Patch, 5035661 to every IAS Oracle Home
          and RDBMS Oracle Home to be cloned. 
          If you are having 10g Oracle Home,
          there is no need of applying this patch. 
          You need to apply this patch on IAS Oracle Home 
         (if Database is not 10g)

A. Applying the patch on the iAS $ORACLE_HOME:

   ====================================================
   (a)  Unzip the patch into the <iAS ORACLE_HOME> directory:
       $unzip -od /d01/prodora/iAS p5035661_11i_LINUX.zip
   (b)   Source the Apps environment file :
         $. $APPL_TOP/APPSORA.env
   (c)   Change directory to the <IAS ORACLE_HOME>/appsoui/setup
        $cd $IAS_ORACLE_HOME/appsoui/setup
   (d)  Execute the perl script OUIsetup.pl:
       $perl OUIsetup.pl
  NOTE:
  In the case of a Multi-Node instance, the above process
  should be repeated on the <iAS ORACLE_HOME> of each Node.
(B) Applying the patch on the RDBMS $ORACLE_HOME: 
     (This step is not required for my current setup, 
    because my database version is 10g R2)
  (a)  Unzip the patch into the <RDBMS ORACLE_HOME> directory:
       $unzip -od /u01/proddb/9.2.0 p5035661_11i_LINUX.zip
  (b)  Source the DB environment file :
       $. $ORACLE_HOME/PROD_prodserver.env
  (c) Change directory to the <RDBMS ORACLE_HOME>/appsoui/setup
      $cd $ORACLE_HOME/appsoui/setup
  (d) Execute the perl script OUIsetup.pl:
      $perl OUIsetup.pl
======> Check all other Requirements as Perl, JRE, JDK, ZIP utilities on Source and Target Nodes as per
        document “Cloning Oracle Applications Release 11i with Rapid Clone”
=======> Apply the Latest AD Minipack on Application Tier (Latest One is AD.I.5)
=======è Apply the Latest Autoconfig Template Patch and Latest Rapidclone Patches to Application Tier (Check Metalink for These Patches)
Stage2: Prepare the Source System (PRODSERVER)
      (a) Login into Database Tier as ORACLE user and run the preclone
           $cd $ORACLE_HOME/appsutil/scripts/PROD_prodserver
           $perl adpreclone.pl dbTier
      (b) Login into the Application Tier as APPLMGR User and run the  preclone
           $cd $COMMON_TOP/admin/scripts/PROD_prodserver
           $perl adpreclone.pl appsTier
Stage3: Put the Database in Begin Backup Mode and copy the Database Files 
       (a)   Login into database as sysdba user
             $sqlplus “/as sysdba”
             Sql> alter database begin backup;
       (b)   Copy Archive log files created during hot backup to /backup directory.
       (c)   Copy the All Data files to /backup directory.
       (d)   Backup the control file to trace.
             Sql> alter database backup control file to trace;
             Copy this trace file to /backup directory
       (e)   Copy the current init.ora file to /backup directory
       (f)   End the Begin Backup Mode.
             Sql> alter database end backup.
 Stage4: Copy the Application Tier File System Files
         (a)Login into the Application Tier as APPLMGR user and copy the APPL_TOP, COMMON_TOP, 
             IAS ORACLE HOME and 8.0.6 Oracle Home to /backup directory
 Stage5: Copy the Source Database files and Application Files to Target server
     Copy the parameter file, backup control file and archive log files from /backup directory  
          to /d01, /d02 and /d03 in target server.
 Stage 6: Configure the Target Database (TESTSERVER)

Log on to the target system as the ORACLE user

(1)     Configure the <RDBMS ORACLE_HOME>

cd <RDBMS ORACLE_HOME>/appsutil/clone/bin

perl adcfgclone.pl dbTechStack

(2)     Create the target database control file manually

Open the backed up control file

a. remove all lines before the startup nomount statement

b. Modify the REUSE to SET

c. Modify Source DB SID to Target SID (Here PROD to TEST)

d. Modify NORESETLOGS TO RESETLOGS

e. delete all lines after the CHARACTER SET statement

————————————

CREATE CONTROLFILE SET DATABASE “TEST” NORESETLOGS  ARCHIVELOG…

LOGFILEGROUP 1

‘/d03/log01.log’ SIZE 50M,

DATAFILE

‘/d03/system01.dbf’,

‘/d03/undotbs01.dbf’,

CHARACTER SET UTF8;

—————————————————–

On the target system, modify the init.ora to have the target SID and location of the control file and also make sure that init.ora parameters are set for archive log mode On the target system,

starup the database in nomount stage

sql> startup nomount pfile=< Target init.ora path>

sql> @clone.ctl         ( here clone.ctl is the control file which we have modified above)

Once control file is created, database will be in mount stage

execute recover command using backup control file after the database is mounted

SQL> RECOVER DATABASE USING BACKUP CONTROLFILE UNTIL CANCEL;

After the last archive log has been applied, issue the following command

SQL> alter database open resetlogs;

After opening the database, add temp files to target database

(3) Run the library update script against the database

cd <RDBMS ORACLE_HOME>/appsutil/install/<CONTEXT NAME     sqlplus “/ as sysdba” @adupdlib.sql <libext>

Where <libext> is “sl” for HP-UX, “so” for any other UNIX platform and      not required for Windows.

(4)Configure the target database (the database must be open)

cd <RDBMS ORACLE_HOME>/appsutil/clone/bin

perl adcfgclone.pl dbconfig <target context file>

where target context file is: <RDBMS ORACLE_HOME>/appsutil/<Target CONTEXT_NAME>.xml

Stage 7 :  Configure the Target Application Tier

Logon to the target system as the APPLMGR user and type the following commands

$Cd $COMMON_TOP/clone/bin

$Perl adcfgclone.pl appsTier

Finishing tasks:

(1)     Update Profile options

(2)     Update Printer Settings

(3)     Update the workflow configuration settings

(4)     Verify the APPLCSF variable setting

(5)     Update the session_cookie_domain value in icx_parameters

For the finishing tasks, check the finishing tasks section of the following document

Cloning Oracle Applications Release 11i with rapid clone Note: 230672.1

November 11, 2009

VNC CONFIGURATION

Filed under: Apps11i — jcprasadinfo81 @ 8:41 am

VNC CONFIGURATION

1)      Login as root on Redhat Linux Server

2)      First we need to check the VNC packages installation.

rpm –qa | grep vnc

$ rpm –qa | grep vnc

Vnc-server-4.0-8.1

Vnc-4.0-8.1


The vnc package is installed as shown above. If not then install vnc package.

3)      To start the VNC on system boot time,

# chkconfig –level 345 vncserver on

4)      Uncomment the following lines and add all the VNC sessions required to start at the startup time in the /etc/sysconfig/vncservers file.

VNCSERVERS=”1:root 2:oracle”

VNCSERVERARGS[1]=”-geometry 800×600”

# vi /etc/sysconfig/vncservers

5)      Login as the user for whom you want to configure VNC or use this command to login.

# su – oracle

6)      Run the vncserver command to configure the VNC-based X session.’

Note: The vncserver :1 will create the $HOME/.vnc> directory for the user and will ask for a VNC password. This password will be requested by the VNC viewer program when connecting from a remote machine.

7)      If the user wants to change the VNC password, in future the following command will be used:

$ vncpasswd

Password:

Verify:

$ HOME

Cd  .vnc

Vi xstartup

8)      Add the gnome-session & as shown below,

Xterm –geometry 80×24+10+10 –ls –title “$VNCDESKTOP Desktop” & gnome-session &

9)      Save the file

Note: If you want to use KDE, add the following line instead of gnome-session &, startkde &

10)  After setting the desktop, the existing VNC-based X session must be killed through this command.

$ vncserver –kill :1

11)  Restart the VNC session for the effect of the changes. Enter the following commands to restart the newly configured VNC session:

Vncserver :1

Client Side Configuration

Download vnc viewer for windows.

Run the exe & enter Server address,

Keep the encryption as Always off/ power off

Enter username and password.

12)  Cd $HOME/.vnc

13)  Vi xstartup

14)  Uncomment the unset and exec lines and will add xhost +

15)  Save the file.

16)  Existing VNC-based X session must be killed.

$ vncserver –kill :1

17)  Restart the VNC session for the effect of the changes.

$ vncserver :1

18)  Linux desktop will be displayed on your windows XP client.

19)


November 9, 2009

Metalink Notes

Filed under: Apps11i — jcprasadinfo81 @ 1:28 am

E-Business Suite

Autoconfig

165195.1 Using AutoConfig to Manage System Configurations with Oracle Applications 11i
218089.1 Autoconfig FAQ
270519.1 Customizing an AutoConfig Environment

Application Object Library

177183.1 Succesfully Installing NLS/MLS in 11i

Application Server

230688.1 Basic ApacheJServ Troubleshooting with IsItWorking.class With Applications 11i
146468.1 Installing Oracle9i Application Server 1.0.2.2.2 with Oracle Applications 11i
237988.1 How to Enable Rotatelog for 9iAS V2 HTTP Server (Log file rotation)

Cloning

135792.1 Cloning Oracle Applications

Release 11i
230672.1 Cloning Oracle Applications Release 11i with Rapid Clone

Concurrent Manager

105133.1 Concurrent Manager Questions and Answers Relating to Generic Platform
213021.1 Concurrent Processing (CP) / APPS Reporting Scripts
185489.1 Setting Up Parallel Concurrent Processing On Unix Server
241370.1 Concurrent Manager Setup and Configuration Requirements in an 11i RAC Environment

Critical Patch Update

Oracle Security Pages Main Link
372927.1 Oracle Critical Patch Update July 2006 Advisory
372928.1 Oracle Critical Patch Update July 2006 Documentation Map
372930.1 Critical Patch Update Availability for Oracle Server and Middleware Products ( Database, Application Server , Collaboration Suite, Enterprise manager)
359362.1 Known Issues Applying Oracle Database 10.1.0.5 Patch Set to OracleAS 10g (10.1.2)
361800.1 oidldapd Fails to Start With Various Symptoms after Jul 2006 CPU
372931.1 E-Business Suite Critical Patch Update Note

Database with Apps

362203.1 Oracle Applications Release 11i with Oracle 10g Release 2 (10.2.0)
216205.1 Database Initialization Parameters for Oracle Applications 11i
362135.1 Configuring Oracle Applications 11i with 10g R2 RAC & ASM

Discoverer with Apps

257798.1 Using Discoverer 10g with Oracle Applications 11i
139516.1 Discoverer 4i with Oracle Applications 11i
257613.1 How to check the Discoverer versions installed on UNIX platforms
66698.1 How To Create a Discoverer Desktop, Plus or Viewer Debug Trace For All Platforms
118360.1 How To Configure MS Internet Explorer To Use Jinitiator with Discoverer Plus

Display with Apps Reports & other component

181244.1 Configuring an X Display Server for Applications on Unix Platforms

Forms with Oracle Apps

125767.1 Upgrading Developer 6i with Oracle Applications 11i
167635.1 How To Perform Forms Runtime Diagnostics (FRD) Tracing in Applications 11i
232313.1 Information on Previous Versions of Developer 6i Patchsets
201340.1 Using Forms Listener Servlet with Oracle Applications 11i

JDBC with Oracle Applications

364704.1 A Guide to Configure, Maintain & Troubleshoot JDBC Buffers in Oracle Application

Patching

231701.1 How to Find Patching History (10.7, 11.0, 11i)

Shared APPL_TOP

233428.1 Sharing the Application Tier File System in Oracle Applications 11i
243880.1 Shared APPL_TOP FAQ


November 7, 2009

JVM Tuning (Garbage Collection) in Oracle Apps 11i

Filed under: Apps11i — jcprasadinfo81 @ 1:21 pm

There are some good notes on JVM tuning from Mike Shaw on Steven Chan’s blog  here , here and here and some good Metalink notes at end of this post.
Important thing missing from all these notes (for some one like me who is new to Java) is basics of Garbage Collection, Generation and how to read GC output.
In this post I’ll start with basics of JVM GC (Garbage Collection) and then in next post apply this theory for real time performance issues w.r.t. JVM (11i Java Virtual Machine) .

Garbage – Java object is considered garbage when it can no longer be reached from any pointer in the running program.

Generations – Memory in JVM is managed in terms of generation i.e. Young generation and tenured generation. Memory pool holding object of different ages like young, tenured. If a particular generation fills up, garbage collection occurs.

A. Young generation – Objects are initially allocated in Young generation (most of objects die here). When Young generation fills up, it causes Minor Garbage Collection. Any objects survived after Minor GC (Garbage Collection) are moved to Tenured Generation.  Minor Garbage collection is quick as compared to Full/Major GC.

B. Tenured generation – Surviving objects (from young generation) after minor garbage collection are moved to area called tenured generation, When tenured generation fills up it causes major collection (aka Full GC or Full Garbage Collection). Major collection is slow as it involves all live objects.

Garbage Collection (GC) – is program which clears garbage(dead java objects). Garbage Collection work on fundamental principle that majority of java objects die young (quickly after arriving in JVM). There are two kind of Garbage Collection Minor Garbage Collection and Major Garbage Collection (aka Full GC)

Example of Minor GC –  3824.164: [GC 196725K->141181K(209864K), 0.3295949 secs]
Example of Minor GC –  3841.051: [Full GC 150466K->87061K(217032K), 3.2626248 secs]

Pauses: is the time when application becomes unresponsive because garbage collection is occurring.

.

Understanding JVM parameter for 11i
Sizing the generation is very important in tuning JVM GC. Before jumping to Sizing generation (Young and Tenured) lets look at default 11i JVM parameters

In context file($APPL_TOP/ admin/ $CONTEXT_NAME.xml) default entry for JVM is like

<jvm_options oa_var=”s_jvm_options” osd=”Solaris”>-verbose:gc -Xmx512M -Xms128M -XX:MaxPermSize=128M -XX:NewRatio=2-XX:+PrintGCTimeStamps -XX:+UseTLAB </jvm_options>

1. Above line represents JVM (OACoreGroup) size in 11i
2. -Xms128M, means start with 128MB heap size
3. -Xmx512M, means grow JVM heap size upto max size of 512 MB
4. -XX:NewRatio=2 is to control young generation i.e. ratio between young and tenured generation is 1:2 (i.e. if size of young generation is 50 MB then size of tenured generation should be approx. 100MB)
5. -XX:MaxPermSize=128M limit the permanent generation to 128M (permanent generation is part/area in tenured generation)
6. -XX:+UseTLAB represents to use thread-local object allocation
7. There are two more parameters (11i JVM uses default values) -XX:MinHeapFreeRatio=<minimum> & -XX:MaxHeapFreeRatio=<maximum> with default value of 40 & 70 resp. (for Solaris)

If percentage of free space in generation falls below 40%, size of generation will expand and if percentage of free space exceeds 70%, the size of generation will shrunk.

.
Various type of Garbage Collector
From JDK 1.4.2 there are total 4 type of collectors (prior to 1.4.2 it was just one collector i.e. default collector)

1. Default Collector: JDK prior to 1.4.2 uses default collector. If you don’t specify any parameter with JVM default is default collector.

2. ThroughPut Collector : This collector uses parallel version of young generation collector but Tenrured generation is collected in normal way. To set throughput collector use –XX:+UseParallelGC so change

<jvm_options oa_var=”s_jvm_options” osd=”Solaris”>-verbose:gc -Xmx512M -Xms128M -XX:MaxPermSize=128M -XX:NewRatio=2 -XX:+PrintGCTimeStamps -XX:+UseTLAB </jvm_options>
to
<jvm_options oa_var=”s_jvm_options” osd=”Solaris”>-verbose:gc -Xmx512M -Xms128M -XX:MaxPermSize=128M -XX:NewRatio=2 -XX:+PrintGCTimeStamps -XX:+UseTLAB -XX:+UseParallelGC</jvm_options>

3. Concurrent Low Pause Collector : Concurrent Collector is used to collect tenured generation collection concurrently with execution of application. Parallel version of collector is used for young generation. To set Concurrent Low Pause Collector use –XX:+UseConcMarkSweepGC
like
<jvm_options oa_var=”s_jvm_options” osd=”Solaris”>-verbose:gc -Xmx512M -Xms128M -XX:MaxPermSize=128M -XX:NewRatio=2 -XX:+PrintGCTimeStamps -XX:+UseTLAB -XX:+UseConcMarkSweepGC</jvm_options>

4. Incremental low pause collector : This collector collects just portion of tenured generation at each minor garbage collection. To use Incremental low pause collector use
-Xincgc

If you are on JDK 1.4.2 with multi CPU try setting Concurrent Low Pause Collectoras Garbage Collector.

Thumb rule for Grabage Collection/ JVM tuning w.r.t. 11i
1.
Stay on latest JVM/JDK version where ever possible (latest certified with 11i is JRE 6, you should be at-least 1.4.2 and higher)
2. For OACoreGroup consider no more than 100 active users per JVM
3. There should NOT be more than 1 active JVM per CPU
4. Try to reduce GC (Garbage Collection) frequency (specially Major/Full GC). Play with various JVM parameters like (-Xmx, -Xms, -XX:MaxPermSize, -XX:NewRatio, -XX:+UseParallelGC/ -XX:+UseConcMarkSweepGC)
5. If you are on JDK 1.4.2 with multiple CPU middle tier, use Concurrent Low Pause Garbage Collector by setting -XX:+UseConcMarkSweepGC with JVM
6. If you are using Oracle Configurator, assign dedicated JVM for configurator requests
7. Try setting JVM max size NOTgreater than 1 GB, (use multiple JVM’s of 512MB or 1024 MB), this is to reduce GC time (more heap size means more time in GC)
8. Minor GC should be occurring at interval long enough to allow many objects to die young (i.e. lot of objects should die between two minor GC).
9. Throughput (which is time NOT spent on GC) is inversely proportion to amount of memory. Higher the memory for JVM, more time for GC meaning low throughput.
10. Unless you have problems with pauses (time when application becomes unresponsive because garbage collection is occurring), try granting as much memory as possible to VM (128 to 512 is good start and fine tune as per load testing results)
.

How to find JDK version used by Apache/Jserv (JVM) in 11i ?

In context file search for parameter like s_jdktop

<JDK_TOP oa_var=”s_jdktop”>/oracle/apps/11i/vis11icomn/util/java/1.4/j2sdk1.4.2_04</JDK_TOP>

Where is JVM log location in 11i ?
$IAS_ORACLE_HOME/ Apache/ Jserv/ logs/ jvm/ OACoreGroup.0.stdout  (GC output)
$IAS_ORACLE_HOME/ Apache/ Jserv/ logs/ jvm/ OACoreGroup.0.stderr  (JVM Error)

.

How to read GC (JVM stdout) file ?

Example of JVM out file to understand Garbage Collection in 11i

3824.164: [GC 196725K->141181K(209864K), 0.3295949 secs]
3840.734: [GC 207741K->150466K(217032K), 0.3168890 secs]
3841.051: [Full GC 150466K->87061K(217032K), 3.2626248 secs]
3854.717: [GC 155413K->97857K(215568K), 0.2732267 secs]
3874.714: [GC 166209K->109946K(215568K), 0.3498301 secs]

1. Line 1,2 4 and 5 are example of Minor Collection
2. Line 3 (Full GC) is example of Major Collection
3. First entry in each line is time in seconds since JVM started, To find out time between two GC (Garbage Collection) just subtract second entry from first i.e. (3840.734 – 3824.164 = 16.57 seconds)
4. 196725K->141181K in first line indicates combined size of live objects before and after Garbage Collection (GC)
5. (209864K) in first line in parenthesis, represents object after minor collection that aren’t necessarily alive but can’t be reclaimed, either because they are directly alive, or because they are referenced from objects in tenured generation.
6. 0.3295949 secs in first line represents time taken to run minor collection.
7. Full GC in line three represents Full Garbage Collection or Major Collection

.
References

  • 362851.1 Guidelines to setup the JVM in Apps E-Business Suite 11i and R12
  • 370583.1 Basic troubleshooting of JVM consuming cpu or too many JDBC connections in Apps 11i
  • 567647.1 Using Various Garbage Collection Methods For JVM Tuning
  • 390031.1 Performance Tuning Forms Listener Servlet In Oracle Applications
  • Garbage Collection in Sun JDK
  • GC Example
« Previous PageNext Page »

Create a free website or blog at WordPress.com.